Interpersonal Level
Interpersonal-level interventions for moped/scooter safety can utilize close relationships to influence a person’s safe riding behaviors. Previous research has shown that peer pressure can affect the helmet use of motorcycle riders (Zamani-Alavijeh, Bazargan, Shafiei, & Bazargan-Hejazi 2011; Germeni, Lionis, Davou, & Petridou 2009). Therefore, influential relationships among moped/scooter riders may include peer riders and riding instructors/mentors.
Scooter Training Guide
A moped/scooter is a motor vehicle capable of traveling at relatively high speeds and is permitted to operate on various roadways shared with other vehicles, such as cars and trucks. While mopeds/scooters offer distinct advantages to users, it’s important to note that users can be vulnerable to crashes and injuries.
This training course aims to acquaint students with the fundamentals of moped/scooter riding, encompassing essential details about protective gear usage and guidelines for riding safely on the road.
Course Objectives
- 1. Student will be able to launch, accelerate with traffic, stop, stop quickly, and execute low- and high-speed turns.
- 2. Student will understand the basic controls and components of the scooter.
- 3. Student will understand the purpose and importance of protective gear.
Prerequisites

Student is able
to ride a bicycle

Student is in reasonably
good physical health

Student is alert and
ready to learn

Student holds a
class E driver’s license
Safety Gear
The following equipment will be worn by the student during any operation of the scooter. Instructor should discuss the importance of safety gear use for every ride.

DOT-compliant helmet

Full-fingered
motorcycle gloves

Long-sleeved shirt

Long pants of a durable material

Sturdy, over-the-ankle footwear
Lesson 1: Learning Your Moped/Scooter
A. Encourage familiarization with the following basic controls, keeping in mind that, as every scooter is different, it is important to read the scooter owner’s manual.
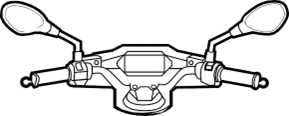
Handlebars and Grips
- • Point out the handlebars and explain that they provide steering control.
- • Demonstrate how to grip the handlebars securely and comfortably.
- • Explain the importance of maintaining a relaxed grip for smooth control.
Throttle

- • Highlight the throttle grip, usually located on the right handlebar.
- • Explain that twisting the throttle increases the engine speed, leading to acceleration.
- • Caution the student about the importance of gradual throttle control and avoiding sudden or excessive acceleration.
Brake Levers

- • Identify the brake levers, usually located on both handlebars.
- • Explain that the right lever operates the front brake, and the left lever operates the rear brake.
- • Emphasize the need for smooth and controlled braking to avoid skidding or loss of control.
Ignition Switch

- • Locate the ignition switch, typically located near the handlebars or beneath the seat.
- • Explain that turning the ignition switch to the “On” position powers the scooter, and that the rear brake level may need to be squeezed to start the ignition.
- • Caution the student to always ensure the ignition switch is turned off when parking or leaving the scooter unattended.
Headlight and Turn Signals

- • Point out the headlight and explain its purpose for visibility during low-light conditions.
- • Demonstrate how to operate the turn signals, explaining their significance for indicating turns or lane changes.
Horn

- • Identify the horn button, usually located near the handlebars.
- • Explain that the horn is used to alert others in emergency situations or to signal attention.
Mirrors

- • Show the student the rear-view mirrors located on both sides of the scooter.
- • Explain that mirrors provide essential visibility of the surrounding traffic.
- • Demonstrate how to adjust the mirrors to ensure a clear view of the rear.
B. Mounting, Dismounting & Start-Up Procedures
Demonstrate proper mounting and dismounting techniques, as well as the start-up procedure specific to the scooter. Have students (in full gear) practice these skills independently to check for understanding.
Lesson 2: Throttle Familiarity, Starting, and Stopping
A. On the instructor’s signal, have students mount, start, and power-walk the moped/scooter to a starting area. Using a gradual rolling on and off of the throttle, encourage students to “walk” (while mounted) the scooter along a designated practice path and brake smoothly (using both brakes) upon reaching the end of the path.
B. As the lesson progresses and students become comfortable with the throttle, they may place their feet on the floorboards or pegs as they gain enough stable speed along the practice path to do so with control.
Lesson 3: Acceleration, Stopping, & Slow-Speed Turns
A. On the instructor’s signal, have students ride through a designated slow-speed path and stop at the beginning of an acceleration path.
B. On signal, students will ride down the acceleration path, increasing their speed to achieve a brisk pace. Use both brakes to come to a smooth, controlled stop at the end of the acceleration path.
C. On signal, students will slowly ride through the turn and proceed through the slow-speed path. Repeat as necessary to establish mastery.
Watch for the student’s ability to keep their eyes up, accelerate and brake smoothly, and maintain balance while executing slow turns.
Lesson 4: Basic Maneuvering and Initiating Lean
A. On the instructor’s signal, students will ride an oval path around the perimeter of the practice area. Instructors should ensure students are speeding up in the straightaways and slowing for the corners. Encourage students to turn their head to “look where they want to go” and press on the handgrip to initiate lean into the corners.
B. After sufficient practice of the oval path, students will weave in and out of markers placed 20–30 feet apart on both sides of the path to practice steady throttle and handlebar input.
Watch for the student’s ability to adjust their speed, negotiate weaves, and make smooth turns.
Lesson 5: Slow-Speed Maneuvers
A. On the instructor’s signal, students will execute a figure 8 (two U-turns), S-turn, and a perimeter turn as set up in the practice area. Students should be encouraged to maintain smooth control, turn handlebars sufficiently, keep head and eyes up, and turn their head when necessary.
Lesson 6: Negotiating Curves
A. On the instructor’s signal, students will ride the practice oval at a brisk pace. Encourage students to brake sufficiently before entering the curve to set a safe entry speed. Reverse the direction of the exercise.
Ensure student is smoothly operating the scooter and maintaining control. It may be necessary to spend extra time on this lesson to specifically emphasize brisk acceleration, braking to entry speed, head turn, and pressing on the handgrip to initiate lean.
Lesson 7: Emergency Stops and Tight Turns from a Stop
A. On the instructor’s signal, students will ride down the practice lane at a brisk, steady speed. As the front wheel of the scooter passes a stop marker, students will quickly stop using both brakes. Once coaching is provided, students will then negotiate the perimeter of the turn, ride down the middle of the practice area, and back to the practice lane to repeat the exercise.
Ensure student is keeping head and eyes up and using both brakes firmly (but not “grabbing” or “stabbing”) without locking either wheel.
Conclusion
This training is an important step in acquiring the skill of moped/scooter riding with a strong focus on safety. Students will immerse themselves in comprehending and becoming well-acquainted with the fundamental controls—namely the throttle, brakes, and handlebars. Instructors will underscore the significance of executing smooth and controlled maneuvers, practicing gradual acceleration, and mastering proper braking techniques.
It’s crucial to convey to students that as they develop confidence and familiarity with these abilities, they are progressing towards becoming responsible and safe riders. The encouragement to engage in regular practice, adhere to appropriate gear usage, and relish the experience of moped/scooter riding is paired with an unwavering commitment to their own safety and the safety of fellow road users.
References
Germeni, E., Lionis, C., Davou, B. and Petridou, E.T. 2009. Understanding reasons for non-compliance in motorcycle helmet use among adolescents in Greece. Injury Prevention, 15(1), pp.19-23.
Zamani-Alavijeh, F., Bazargan, M., Shafiei, A. and Bazargan-Hejazi, S. 2011. The frequency and predictors of helmet use among Iranian motorcyclists: A quantitative and qualitative study. Accident Analysis & Prevention, 43(4), pp.1562-1569.